
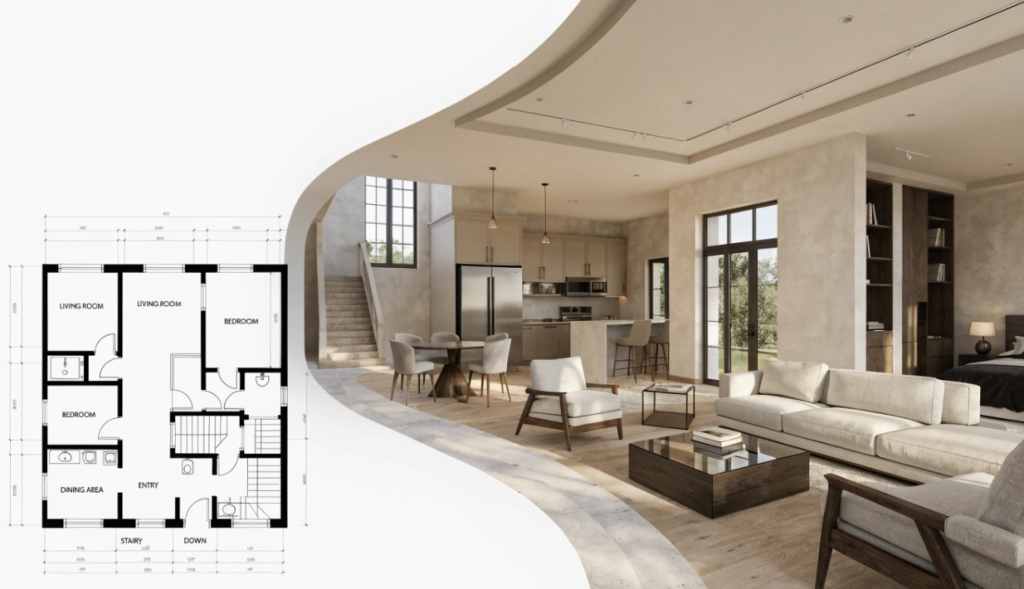
A flat floor plan tells you where the walls go, but it doesn’t tell you how a room will actually feel once you’re standing in it. Ceiling height, window placement, the way light falls across a room, and how furniture looks against a wall are all things a two dimensional drawing struggles to communicate. This is the gap that converting a floor plan to 3D model closes. Instead of imagining a space from lines on paper, you get to see it, walk through it, and evaluate it almost as if it already existed.
This shift from flat drawing to dimensional model has become one of the most useful steps in modern space planning, whether you’re designing a home, staging a property, or planning a commercial space.
Why a Flat Floor Plan Isn’t Always Enough
A traditional floor plan is efficient for communicating layout, but it leaves a lot to interpretation. Two people looking at the same flat drawing can imagine completely different finished rooms. One might picture tall ceilings and large windows, while another imagines something much more compact. This gap between the drawing and the imagined result often leads to disappointment once a project is actually built or furnished.
A few common issues with relying only on flat plans include the following.
- Proportions can be misjudged, since a room that looks spacious on paper might feel cramped once furniture and walls are accounted for in three dimensions
- Light and window placement are hard to visualize, since a flat plan shows where a window is but not how it affects the feel of a room
- Furniture scale is difficult to judge accurately, since a couch that fits neatly in a drawing might dominate the actual room
- Clients and collaborators often interpret the same plan differently, leading to mismatched expectations
Turning that same layout into a 3D model removes most of this guesswork, because the space can be seen rather than imagined.
What Floor Plan to 3D Model Conversion Actually Involves
At its core, this process takes the walls, doors, windows, and room boundaries from a flat plan and extrudes them into a dimensional structure. Once that structure exists, it can be textured, furnished, and viewed from different angles or heights. The general steps typically look like this.
- Start with an existing floor plan, either hand drawn, digitally created, or scanned from a physical document
- Define the walls, doors, and windows so the software understands the structure of the space
- Set ceiling height and wall thickness so the model reflects real world proportions
- Add furniture, fixtures, and finishes to bring the model closer to how the finished space will actually look
- View and adjust the model from multiple angles, including a walkthrough style perspective
The result is a model that behaves much more like a real room than a technical drawing, which makes it far easier to spot problems or opportunities before anything is physically built or purchased.
Who Benefits Most From 3D Floor Plans
While architects and interior designers were the original users of 3D modeling, the tools have become accessible enough that many other groups now rely on them regularly.
- Homeowners planning a renovation who want to see the finished result before committing to contractors or materials
- Real estate agents and property managers who want to give buyers or renters a realistic sense of a space, especially for listings that are still under construction or vacant
- Interior designers presenting concepts to clients, since a 3D view communicates a design idea far more clearly than a flat plan alone
- Small business owners designing a retail space or office, where layout directly affects customer flow or employee efficiency
- Students and hobbyists learning design principles, since seeing a plan in three dimensions builds a much stronger sense of spatial reasoning than a flat drawing does
For nearly all of these groups, the appeal is the same. Seeing a space rather than interpreting a drawing leads to better, faster decisions.
Why Free Tools Matter for This Kind of Conversion
Professional 3D modeling software has traditionally been expensive and difficult to learn, often requiring dedicated training before someone can produce a usable model. For someone who only needs to visualize one room or one renovation project, that investment rarely makes sense.
This is where floor plan to 3D model free tools have made a real difference. They let people test the process without financial commitment, which matters especially for one time projects like a single room remodel or a short term rental listing. Because there’s no cost involved, people are also more willing to try multiple versions of a layout, comparing furniture arrangements or finishes before settling on a final direction.
Free access also lowers the barrier for people who are simply curious about how their space might look, without needing a fully formed project in mind yet. This kind of low pressure exploration often leads to better final outcomes, since ideas can be tested and discarded quickly instead of being decided on too early.
How AI Has Sped Up the Process
Historically, converting a floor plan to 3D required manual modeling, where every wall, door, and window had to be built individually inside specialized software. This process could take hours even for a simple layout. AI has significantly shortened this timeline by automating much of the structural interpretation.
Modern tools can now take a floor plan to 3D conversion and handle several steps automatically.
- Detecting walls, doors, and windows directly from an uploaded floor plan image
- Estimating reasonable room proportions and ceiling heights when exact measurements aren’t provided
- Suggesting furniture placement based on room size and typical use
- Generating a walkthrough style view without requiring manual camera setup
This automation doesn’t remove the need for human judgment, since decisions about style, finishes, and furniture still benefit from a person’s input. What it does remove is the tedious technical labor that used to make 3D modeling inaccessible to anyone without formal training.
Bringing It Together in a Real Project
In a typical project, converting a floor plan to 3D isn’t usually the final step. It tends to fit into a broader planning process that includes budgeting, shopping, and coordinating with other people involved in the space. A common sequence might look like this.

- Create or upload an existing floor plan
- Convert it into a 3D model to get a realistic sense of scale and proportion
- Adjust furniture, finishes, and layout based on how the space actually looks in three dimensions
- Share the model with contractors, roommates, clients, or potential buyers for feedback
- Make further adjustments as decisions are finalized
Because the model remains editable throughout, none of these steps have to be treated as final. A layout can be revisited and refined as a project develops, which is especially useful for renovations or moves that unfold over weeks or months.
Getting Started With Floor Plan to 3D Conversion
If you’re curious about how your own space might look in three dimensions, tools like FloorPlanMaker AI make floor plan to 3D conversion accessible without requiring design software experience. Since it supports floor plan to 3D model free access, you can experiment with a layout before deciding whether it’s worth pursuing further. And because the underlying floor plan to 3D process is automated, you can move from a flat sketch to a realistic model in a fraction of the time it would take using traditional design software.
For anyone planning a renovation, listing a property, or simply trying to understand a space better before committing to changes, seeing a room in three dimensions often makes the difference between a good decision and a costly guess.